How to Retrieve Recently Deleted Files on Windows?
Losing important files can be a nerve-wracking experience, especially when it seems like they’ve vanished into thin air. But don’t panic! If you’re using a Windows system and accidentally deleted something valuable, there’s still hope. In this guide, we’ll walk you through the process of retrieving recently deleted files using a powerful tool called RecoverXData. With a few simple steps, you can retrieve recently deleted files on Windows back as if they were never gone. Let’s dive in!
Understanding Recently Deleted Files
What Happens When Files Are Deleted?
When you delete a file on Windows, it doesn’t immediately disappear forever. Instead, it’s typically moved to the Recycle Bin, where it can be easily restored if needed. However, once you empty the Recycle Bin or delete a file using Shift + Delete, it bypasses the Recycle Bin and becomes harder to retrieve. But even then, the file isn’t completely erased from your system—it just becomes inaccessible to the operating system, making it possible to recover.

Temporary vs. Permanent Deletion
Temporary deletion refers to files that are moved to the Recycle Bin, offering a safety net if you change your mind. Permanent deletion, on the other hand, happens when you delete a file from the Recycle Bin or bypass it entirely. In both cases, the data remains on your hard drive until it’s overwritten by new information. This means there’s a window of opportunity to recover recently deleted files before they’re lost forever.
Why Choose RecoverXData to Retrieve Recently Deleted Files on Windows?
Overview of RecoverXData
 RecoverXData is a specialized data recovery software designed to help users retrieve lost, deleted, or corrupted files on Windows systems. It’s particularly effective for recovering recently deleted files due to its sophisticated scanning algorithms that dig deep into your storage to locate and restore your data.
Key Features
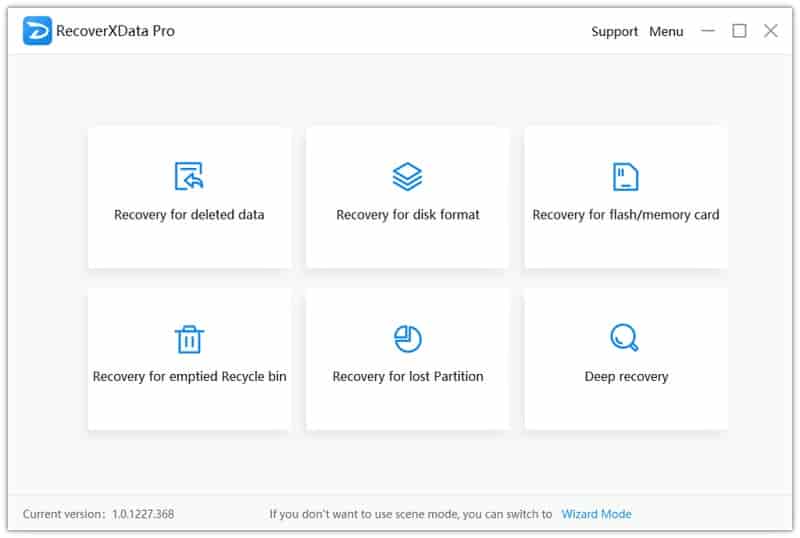
RecoverXData offers a variety of features that make file recovery straightforward and efficient. From deep recovery capabilities that uncover files most software might miss, to its ability to recover various file types (documents, photos, videos, etc.), it’s a robust tool for anyone in need of file recovery. It also supports recovery from different storage devices, including internal drives, external hard drives, USB flash drives, and memory cards. What’s more, you can choose from different recovery modes according to the recovery device and way of deletion.
User-Friendly Interface
One of the standout aspects of RecoverXData is its user-friendly interface. You don’t need to be a tech wizard to use it; everything is laid out clearly, guiding you step by step through the recovery process. This makes it accessible even to those who are not particularly tech-savvy.
Preparing for File Recovery to Retrieve Recently Deleted Files on Windows
Stop Using the Affected Drive
Before you begin the recovery process, it’s crucial to stop using the drive where the files were deleted. This is because any new data written to the drive could overwrite the deleted files, making recovery more difficult or even impossible.
Backup Existing Data
While it may seem counterintuitive, it’s a good idea to back up your current data before starting the recovery process. This ensures that no further data loss occurs during recovery and keeps your existing files safe.
Step-by-Step Guide to Retrieve Recently Deleted Files on Windows
Installing RecoverXData
The first step is to download and install RecoverXData on your computer. Make sure you install it on a different drive than the one where the deleted files were located to avoid overwriting them.
Launching the Software
Once installed, launch RecoverXData. You’ll be greeted by a clean, intuitive interface that prompts you to begin the recovery process.

Choosing the Correct Recovery Mode
RecoverXData offers different recovery modes depending on your needs. For recently deleted files, select the “Recovery for deleted data” mode. This mode is optimized to find and recover files that have been deleted but not yet overwritten.
Scanning for Deleted Files
After selecting the appropriate recovery mode, choose the drive or location where the files were deleted and start the scan. RecoverXData will begin analyzing the drive, searching for recoverable files. The scanning time can vary based on the size of the drive and the number of deleted files.
Previewing and Selecting Files for Recovery
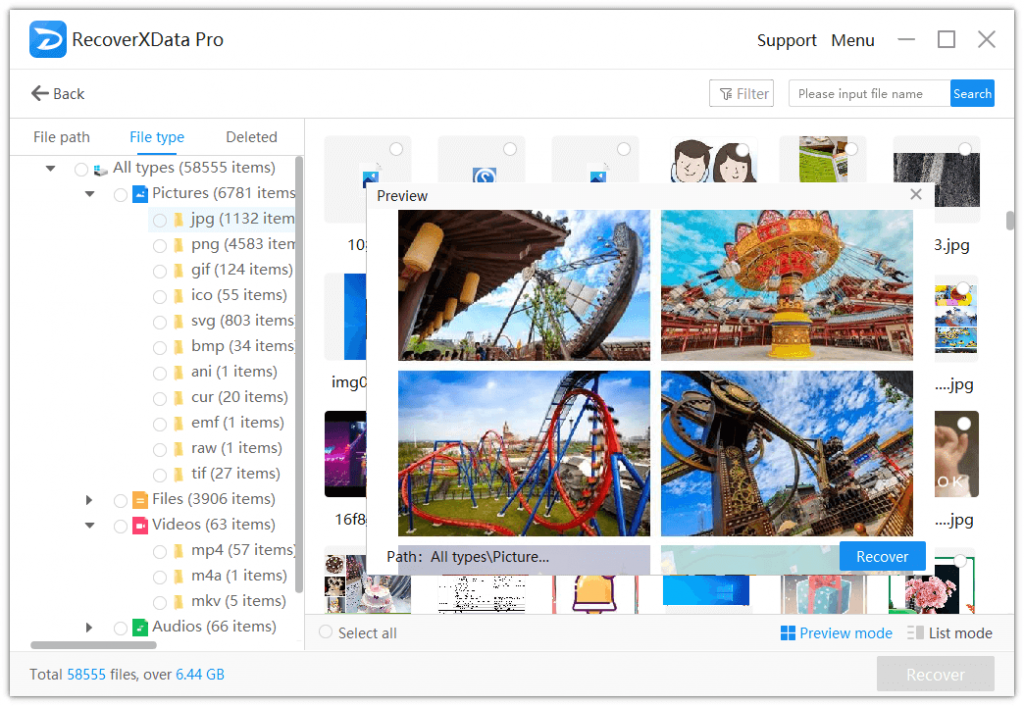
Once the scan is complete, you’ll be presented with a list of recoverable files. RecoverXData allows you to preview these files before recovery, ensuring you select the correct ones. This feature is especially useful for photos and documents.
Completing the Recovery Process
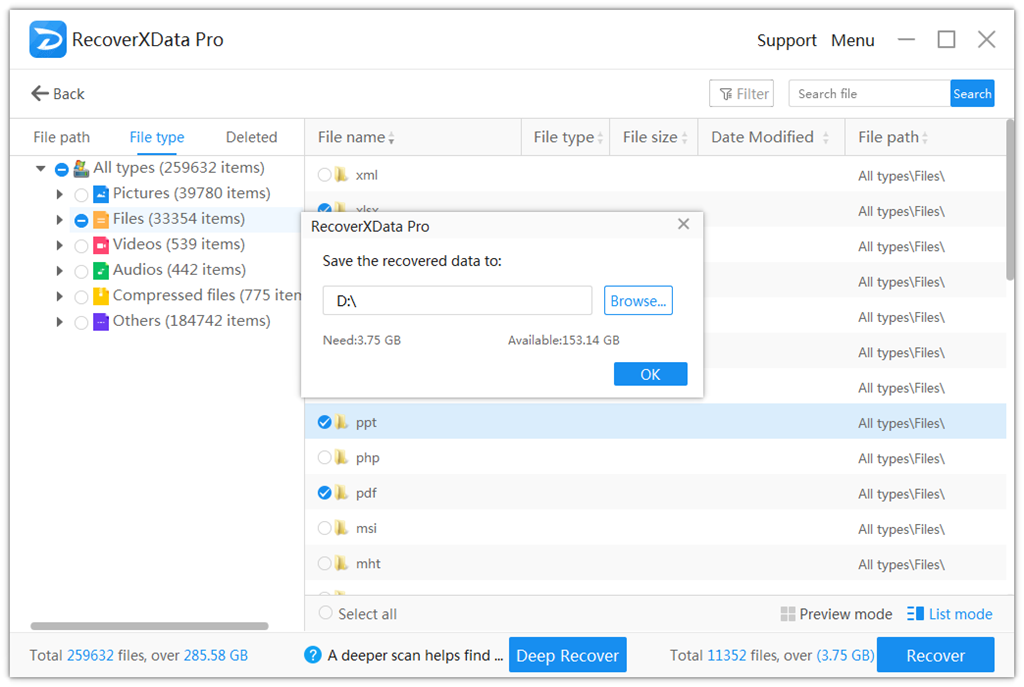
After previewing, select the files you wish to recover and choose a safe location (on a different drive) to save them. With a few clicks, your files will be restored to their former glory!
Tips for Successful File Recovery
Avoiding Overwriting
The most critical tip for successful file recovery is to avoid overwriting the deleted files. This means minimizing any activity on the affected drive until recovery is complete.
Regular Backups
While file recovery software like RecoverXData is incredibly helpful, it’s always better to prevent data loss in the first place. Regularly backing up your data to an external drive or cloud storage ensures you always have a copy of your important files.
Using Advanced Recovery Options
RecoverXData offers advanced recovery options for users who need more granular control over the process. These include deep scans, specific file type searches, and the ability to recover files from formatted or corrupted drives. Utilizing these options can increase the chances of a successful recovery.
Common Mistakes to Avoid
Ignoring Backups
One of the biggest mistakes is neglecting to back up your data regularly. This can leave you vulnerable to data loss in the future, making recovery more challenging.
Running Recovery Software from the Affected Drive
A common error is installing or running recovery software from the same drive where the files were deleted. This can overwrite the files you’re trying to recover. Always use a different drive for the recovery process.
Rushing Through the Recovery Process
Patience is key when recovering deleted files. Take your time to ensure you’re selecting the correct recovery options and carefully previewing files before restoring them. Rushing can lead to mistakes that could make recovery more difficult.
What to Do if the Recovery Fails
Seeking Professional Help
If RecoverXData is unable to recover your files, it may be time to seek professional help. Data recovery specialists have advanced tools and techniques that can recover data from even the most damaged drives.
Trying Alternative Recovery Methods
If professional help isn’t an option, consider trying alternative recovery methods, such as using a different software tool or restoring from a backup if available.
FAQs
Can I recover files deleted a long time ago?
Yes, it’s possible to recover files that were deleted a long time ago, but the success rate depends on whether the data has been overwritten. Using RecoverXData’s deep recovery option can help uncover older files that might not appear in a standard scan. However, the sooner you attempt recovery, the better your chances.
Is RecoverXData safe to use?
Absolutely! RecoverXData is designed to be safe and non-intrusive. It reads data from your drive without writing to it, ensuring that your files remain intact during the recovery process. Additionally, it doesn’t contain any harmful software or malware, so you can use it with peace of mind.
What types of files can RecoverXData recover?
RecoverXData is capable of recovering a wide range of file types, including documents, photos, videos, audio files, emails, and even system files. Whether you’ve lost work files, family photos, or important videos, RecoverXData has you covered.
How long does the recovery process take?
The time it takes to recover files depends on several factors, such as the size of the drive, the number of files being recovered, and the depth of the scan. A quick scan might take just a few minutes, while a deep scan could take several hours. RecoverXData provides an estimated time during the scanning process, so you’ll have an idea of how long it will take.
Can I use RecoverXData on external drives?
Yes, RecoverXData supports recovery from external drives, including USB flash drives, external hard drives, memory cards, and more. Just connect the external device to your computer, select it within RecoverXData, and follow the same recovery process as you would for an internal drive.
Conclusion
Accidentally deleting files can feel like the end of the world, but with RecoverXData, it doesn’t have to be. By following the steps outlined in this guide, you can retrieve recently deleted files on Windows quickly and efficiently. Remember to act quickly, avoid overwriting your data, and use the tips provided to maximize your chances of a successful recovery. With RecoverXData, you have a powerful tool at your disposal to turn a potential disaster into just a minor hiccup. So, next time you hit that delete button by mistake, you’ll know exactly what to do. Happy recovering!
The earlier the data is scanned, the more data will be recovered.
Recover Now


